Growing Guide for Ginger & Turmeric


To keep pricing as low as possible for our market growers, 10 lb and 25 lb quantities of ginger will arrive mostly as large rhizomes. For best yields, we recommend cutting and curing them before planting. Half-pound and 2 lb sizes will be pre-cut, cured, and ready to plant.
First, remove the rhizomes from their packaging and lay them out in a warm dry location.
We’ve taken care to keep these tender rhizomes dormant and protected until they are safe in your hands. As soon as your rhizomes arrive, let them know it’s time to start growing by spreading them out in a warm (70-80°F) dry area. If you want to cut them into smaller pieces, you can do that now (see instructions below). Let them rest in this warm dry area for two weeks before bedding them down.
Cutting Ginger and Turmeric (if necessary)
How to cut ginger: With a sharp knife that has been sterilized in high-proof alcohol between cuts, cut your ginger into pieces that are roughly 1–2 oz or 2–3". We recommend cutting each finger at the narrow base about 1/4" above where it connects to the main rhizome—leaving this stump allows for shrinkage and prevents sunken areas as the cut dries. Place the pieces on a rack with good airflow for about 5 days until the cut areas dry down and cure, and then begin the sprouting process as below.
How to cut turmeric: Turmeric needs less processing than ginger—just snap a few of the larger fingers off, leaving any smaller ones (less than ~1") attached to the main root. Place the pieces on a rack with good airflow for about 5 days until the cuts dry down and cure, and then begin the bedding down process, as below.
Bedding Down (sprouting)
Definitely start sprouting by mid-April. To sprout your ginger or turmeric stock, spread 3" of good potting soil in a crate or other well-drained container, arrange the rhizome pieces on top so they aren’t touching, and add soil to cover by a few inches. Nutrient-rich potting soil such as Vermont Compost Fort Vee gives them a great head start.
Germinating
Keep the soil in your bedded-down crate of ginger or turmeric rhizomes at 80° with a heat mat or in a heated greenhouse. Direct sunlight is helpful, and the heat is crucial. Go light on the watering; especially before sprouts appear, the rhizomes won’t take much water. Only when the soil is dry to the touch should you sprinkle it lightly. Ginger and turmeric are sensitive to overwatering at this stage, but most sprouting failures are due to low or fluctuating temperatures.
Planting Out
In New England and New York, we recommend growing ginger and turmeric in hoophouses or under other cover; this is critical for success in our climate. After the last frost, or in early to mid-June, when hoophouse soil temps are above 60°, dig a 6"-deep trench down the center of a 4'-wide bed. Fertilize well with the nutrients your soil demands—ginger and turmeric are hungry crops, so you may need to sidedress. Plant out sprouted seed 5" apart and cover with several inches of soil. Water in.
Hilling and Cultivating
Hill soil over the crown of the plant where rhizomes begin to show pink. Hand-weed. Water lightly before foliage is established. Once your ginger has recovered from transplant shock, and especially in the hotter days of July and August, water often and liberally.
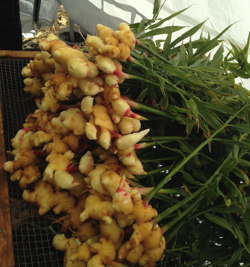
Harvest
Harvest as late as possible before freezing to achieve the greatest yield. For chunky rhizomes, wait until mid-October to dislodge the huge clusters from your hoophouse soil. We’ve found that bagging baby ginger in ¼- or ½-lb bags is the easiest way to get a fair price for this special item.